Showing posts with label raspberry PI. Show all posts

Friday, January 22, 2021

Several configurations for a Raspberry Pi Laptop

The Raspberry Pi is a cool single-board computer, modular, onto which you can hook up web cam, loudspeakers, external hard drives, all kinds of devices.
It has wireless and bluetooth connectivity, several USB ports, an Ethernet port. It has everthing I expect from a computer.
It can play music and movies, with the new Raspberry Pi 4 and its 8 Gigabytes of RAM, I can even do real development work without any problem, with tools like PyCharm or IntelliJ.

The Raspberry Pi 400 has recently been released, this is a very cool configuration to think about. For 100.00 USD it comes with the board (4Gb of RAM), a keyboard and a mouse. "All" you need to add is one (or two) HDMI screen(s).
A desktop HDMI screen can be an expensive device...

Along the same lines, below are a couple of configs I came up with before the Raspberry Pi 400 was released..., keeping in mind that those configs are mobile configs, not desktop ones.

The different configurations presented here can be acheived for less than 150.00 USD. And they do work for real.
Note: The configurations presented below have small screens... But nothing is preventing you to plug in a big one.

Here are several configurations for a small Raspberry Pi based laptop, to be taken on the go.

Click on the pictures to enlarge them.

The links in the text below will lead you somewhere in this git repo, with all the STL files and details on the hardware used for each configuration.


In its Pelican box, with a 7" touchscreen (no keyboard needed, it's like a tablet). The Raspberry Pi is behind the screen, ducked in the foam.

With a wood and plexiglass custom case, a breadboard, wireless keyboard with touchpad, and a 7" HDMI screen

Raspberry Pi 4, 7" HDMI high-definition screen, wireless keyboard, in its own 3D printed holder. (STL files for 3D-printing are available here).
Same config, but without the holder, in a Pelican case It all fits in
Putting things to work At work!

Yet another config, in a waterproof box, with webcam, 5" HDMI screen and small wireless keyboard (STL files for 3D-printing are available here).
In the box, closed. Connecting the loudspeakers
Unpacking At work.

With an Adafruit 3.5" TFT, as explained here:
Same config, with another enclosure (all STL files available here):

And there is a Raspbian OS 64-bit version in preview... I'm looking forward to the 16Gb version of the Raspberry Pi 4!

Sunday, November 29, 2020

Mac Look and Feel, on a real computer!

 Definitely something to check out: Twister OS. 

It runs on pretty much any Raspberry Pi 4, it comes loaded with tons of cool apps, and it possibly looks like a Mac Desktop 😀.

I'll look deeper into it, but it sounds already promising!


Thursday, November 26, 2020

PKIX path building failed

I was gradle'ng on the Raspberry Pi Zero as usual, and during a build, I had the following message: 

sun.security.validator.ValidatorException: PKIX path building failed: sun.security.provider.certpath.SunCertPathBuilderException: unable to find valid certification path to requested target

What the Fr*nch??!

I spent too much time and sweat trying to find a solution.
If that happens to you, just re-install your JDK!

sudo apt-get update 
sudo apt-get install openjdk-8-jdk-headless

The Raspberry Pi Zero cannot - so far - run a Java version above 8. 
This operation above also re-installs the required certificates. 
And you're back on track.

Friday, November 20, 2020

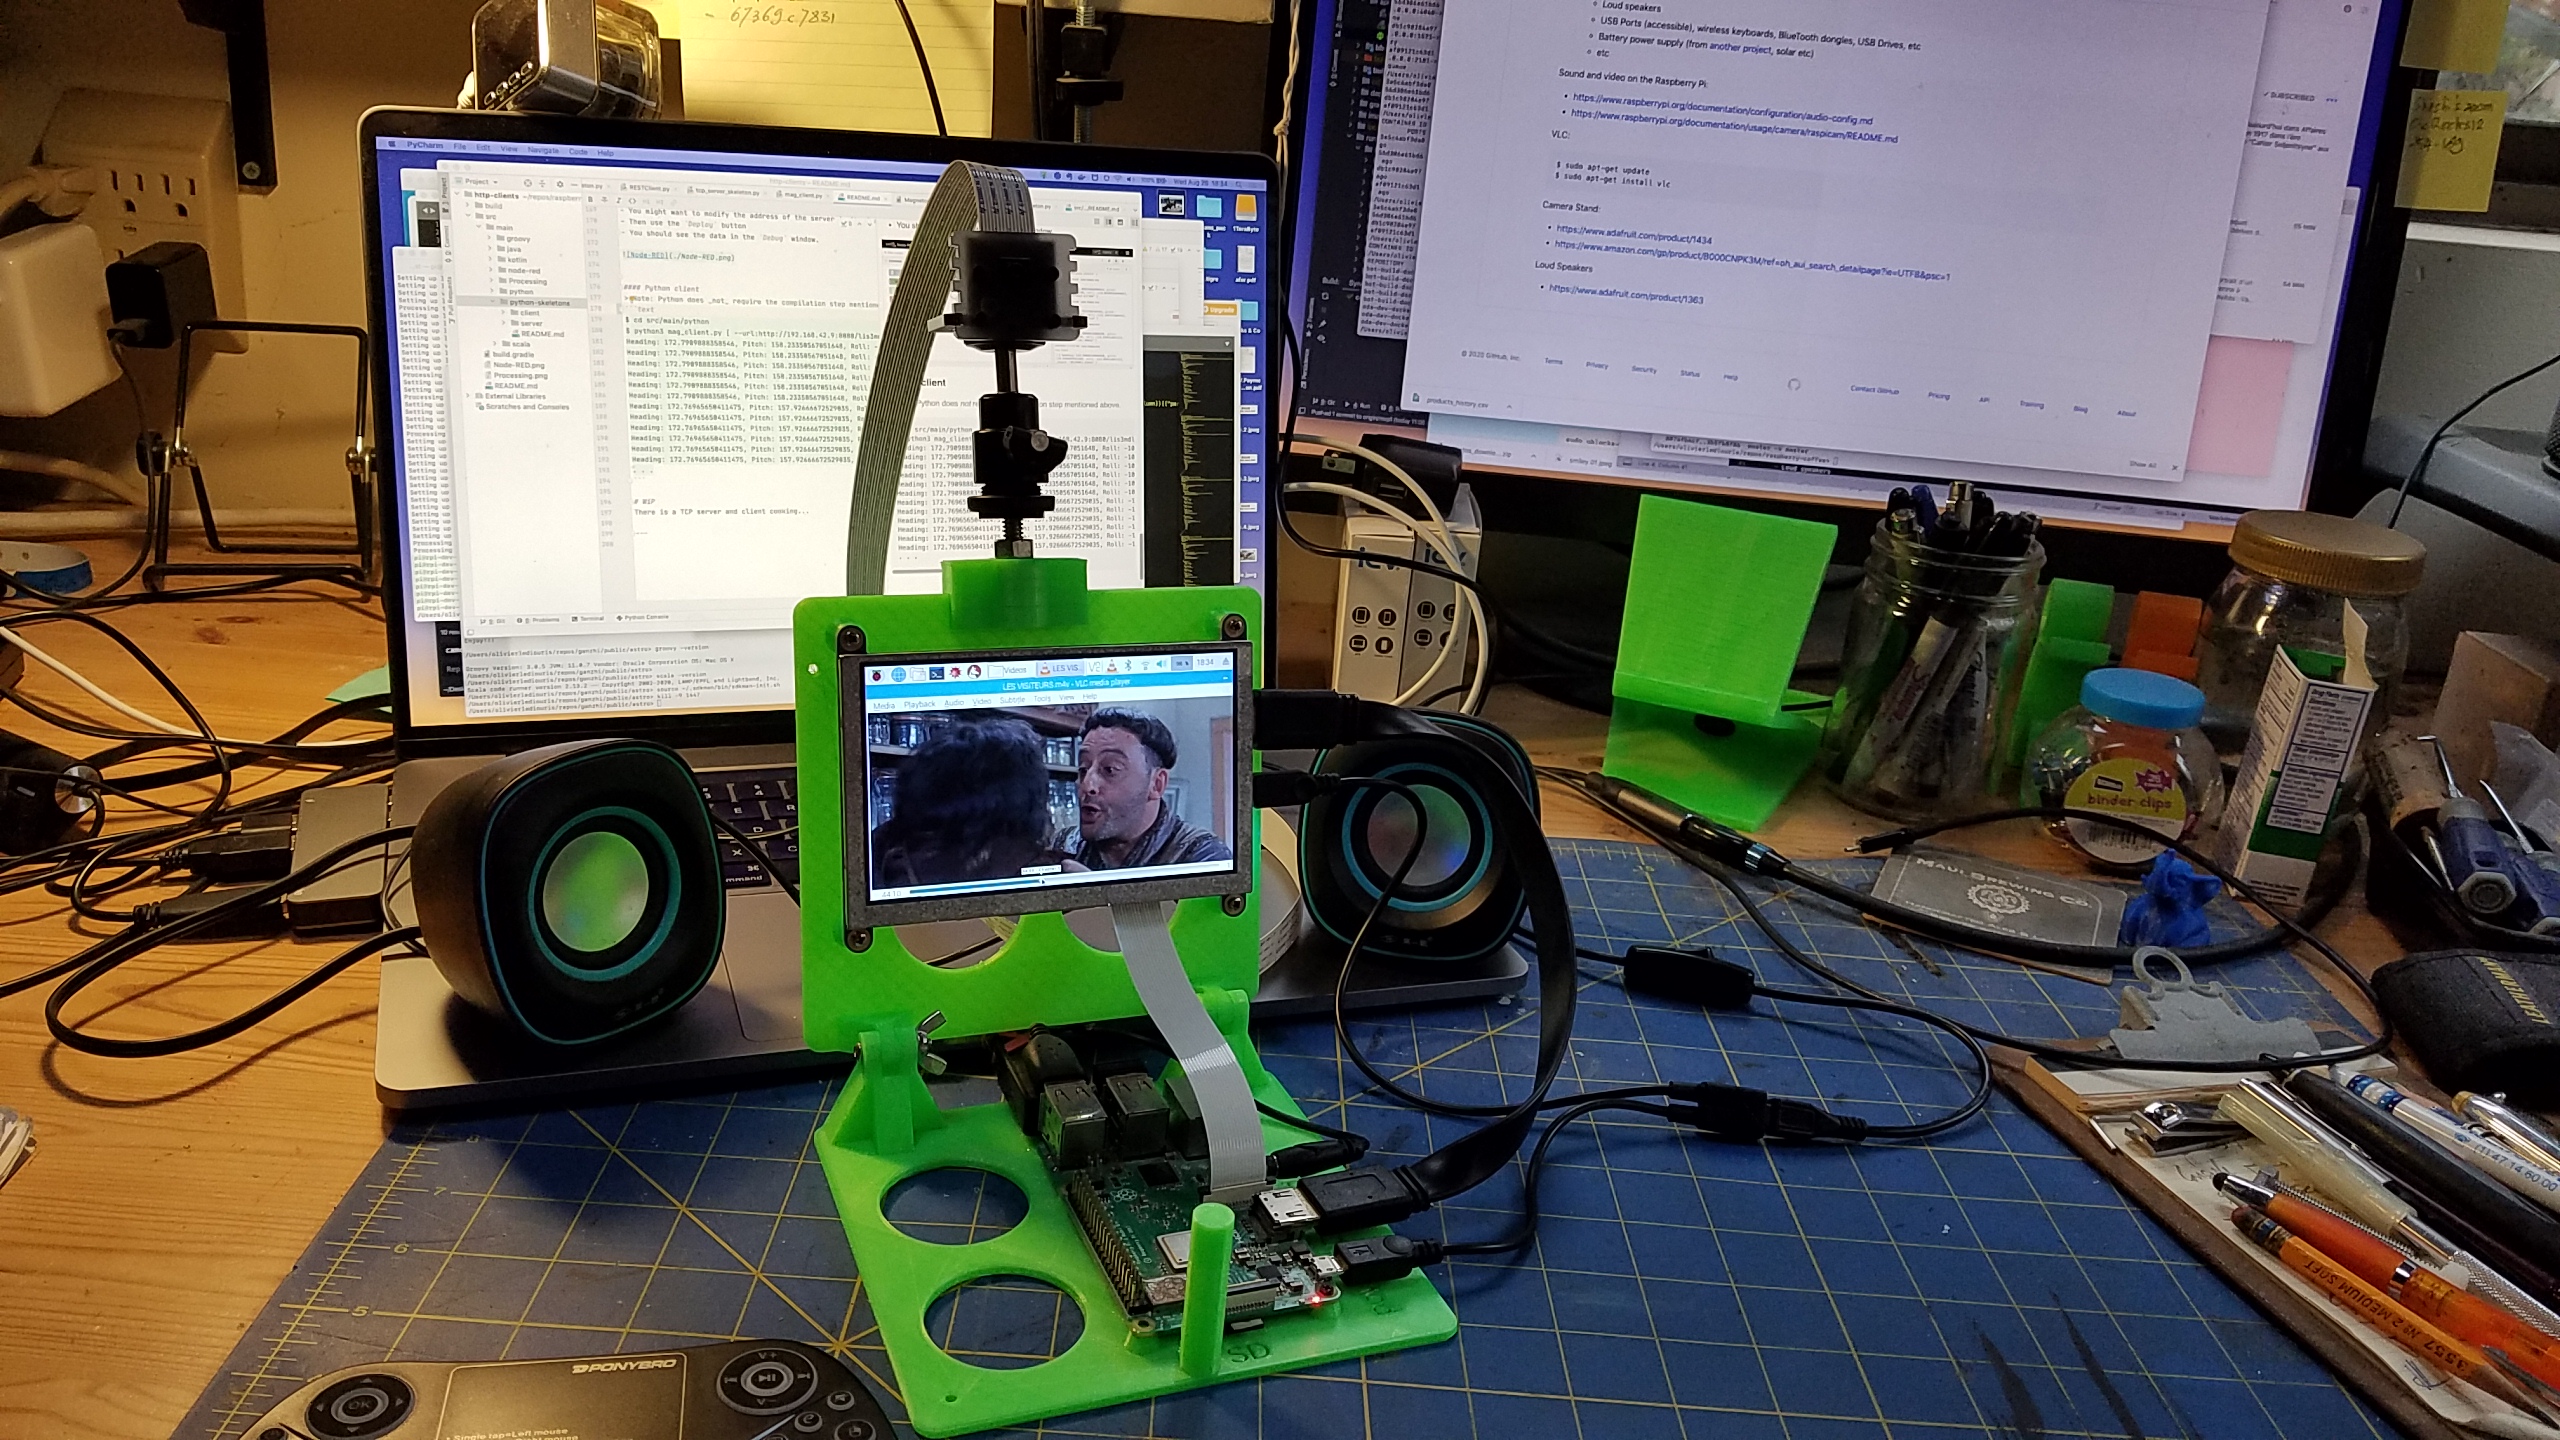
Raspberry Pi based fully featured small laptop

 The full project is here, with the STL and OpenSCAD files for 3D printing, and the list of parts.

It comes with screen, keyboard, touchpad, speakers, camera, USB ports...

It plays movies, music, fully featured!! And for less than $100.

At work


Friday, May 29, 2020

Raspberry Pi 4 with 8GB of RAM...

Released yesterday, there is now a Raspberry Pi 4 with 8Gb of RAM, for $75 in the US!
(See the Raspberry Pi blog).
And it comes along with a beta-64 bit OS, named Raspi OS, that targets Raspberry Pis 3 and higher.

I tried it (on a Raspberry Pi 4, with 4 Gb of RAM), it works fine, and fast!
This beta version does not come with Java installed, but a simple sudo apt-get install default-jdk installs it (JDK 11) in a couple of minutes.
I cloned a repo (https://github.com/OlivierLD/raspberry-coffee.git) and built it without any problem or error.

Now, I might wait a bit longer to get a new Raspberry Pi. As it is now, it should be able to support 16 Gb of RM, I'll wait a bit, and see...

Anyway, that makes yet another good reason NOT to get a Mac.
Steve Jobs vs Eben Upton..., I vote for Eben Upton, biiiiiig time.


Friday, August 30, 2019

Autonomous Raspberry Pi

Solar powered, with a wireless keyboard and touchpad.

Solar powered, with a wireless keyboard and touchpad.


The solar panel

Closed. The keyboard can also fit in the box.

Sunday, April 21, 2019

San Juan Islands, WA

Data logging in San Juan Islands, Washington:

Apr 19-21, San Juan Island

Apr 22, San Juan Island to Orcas Island

Apr 23, Hiking in Orcas Island

Apr 24, Hiking in Orcas Island, Mountain Lake

Apr-25, Back ashore


Data logging was done as explained here, here and here.

Saturday, July 14, 2018

Raspberry PI, PWM, servos, and PCA9685

The code mentioned below can be found in this git repo.
Pulse Width Modulation (PWM) is the technique used from a digital source to simulate an analog output.
For example, imagine that you want to dim an led from a digital device, to make it look like it is glowing. The digital device only has pins that can take 2 values: 0 or 3V3.
0 means that the led will be off, 3V3 means it will be on, at 100% of its brightness.
In short, it is on or off, and there is nothing in between.
But here is an idea to work around that issue:
To show it at 50% of its brightness, the idea is to turn it off 50% of the time, and on 50% of the time.
To show it at 25% of its brightness, it will be on 25% of the time, and off 75% of the time.
If the on-off cycles are short and fast enough, a human eye will no be able to see them, it will only have the illusion of the resulting brightness.
A human eye cannot make the distinction between images separated by less than one 10th of a second. That is why the movies are shot at 24 images per second, so you cannot tell the difference between the frames.
This technique is call Persistence of Vision (POV).
The #1 parameter of PoV is the human retina. To have an idea of how much it is important, just put your cat in front of a TV, and see how much he/she reacts. To a cat, it might just be a fuzzy screen...
The early movies - like Charlie Chaplin's silent ones - were shot at 16 images per second, fast enough to induce POV. They were later projected by faster projectors - 24 frames per second. That is why the characters seem to move faster. They were originally moving normally.


Here are examples of PWM applied to POV:
At work, for real:
The PCA9685 is a servo driver PCB.
The Raspberry PI does not have analog pins, we need to use Pulse Width Modulation to simulate analog values, a servo is an analog device.
We use for that the method setPWM(channel, 0, pulse), that will eventually write to the registers of the device.
An instruction like setPWM(channel, 0, pulse) means:
  • On channel channel (0 to 15 on the PCA9685)
  • in each cycle, turn the power on between 0 and pulse.
pulse has a value between 0 and 4095, that is 4096 distinct values, 4096 is 212, the PCA9685 is a 12 bit device.

The frequency

The frequency is provided in Hertz (Hz). A frequency of 60 means 60 cycles per second.
At 60 Hz, a cycle will be 1 / 60 second, which is 0.01666666 second, or 16.66666 milli-second (ms).

The pulse

For each of the cycles set above by setting the frequency, we need to determine the int value, between 0 and 4095, corresponding to the pulse in milliseconds we want to simulate with PWM.
In the class i2c.servo.pwm.PCA9685.java, this is done in this method:
public static int getServoValueFromPulse(int freq, float targetPulse) {
  double pulseLength = 1_000_000; // 1s = 1,000,000 us per pulse. "us" is to be read "micro (mu) sec".
  pulseLength /= freq;  // 40..1000 Hz
  pulseLength /= 4_096; // 12 bits of resolution. 4096 = 2^12
  int pulse = (int) Math.round((targetPulse * 1_000) / pulseLength); // in millisec
  if (verbose) {
    System.out.println(String.format("%.04f \u00b5s per bit, pulse: %d", pulseLength, pulse));
  }
  return pulse;
}
The cycle length (in ms) obviously depends on the frequency.
The pulse required for the servo to work is emitted once per cycle.

Example

As an example, let us calculate for a 60 Hz frequency the pulse value to send to setPWM(channel, 0, pulse) for a 1.5 millisecond PWM:
  • 1 cycle has a duration of 1 / 60 second, or 16.66666 milliseconds.
  • each cycle is divided in 4096 slots, we can say that 4096 bits = 16.6666 ms.
  • the solution is provided by a rule of three: value = 4096 * (pulse / 16.66666), which is 368.64, rounded to 369.

A comment about servos' compliance and reliability

Theoretically, servos follow those rules:
PulseStandardContinuous
1.5 ms0 °Stop
2.0 ms90 °FullSpeed forward
1.0 ms-90 °FullSpeed backward
That happens not to be always true, some servos (like https://www.adafruit.com/product/169 or https://www.adafruit.com/product/155) have values going between 0.5 ms and 2.5 ms.
Before using them, servos should be calibrated. You can use the class i2c.samples.IntercativeServo.java can be used for that, you set the pulse values interactively, and you see what the servo is doing.
$> ./inter.servo
Connected to bus. OK.
Connected to device. OK.
freq (40-1000)  ? > 60
Setting PWM frequency to 60 Hz
Estimated pre-scale: 100.72526
Final pre-scale: 101.0
Servo Channel (0-15) : 1
Entry method: T for Ticks (0..4095), P for Pulse (in ms) > p
Enter 'quit' to exit.
Pulse in ms > 1.5
setServoPulse(1, 1.5)
4.0690 μs per bit, pulse:369
-------------------
Pulse in ms > 0.5
setServoPulse(1, 0.5)
4.0690 μs per bit, pulse:122
-------------------
Pulse in ms > 0.6
setServoPulse(1, 0.6)
4.0690 μs per bit, pulse:147
-------------------
Pulse in ms > 2.4
setServoPulse(1, 2.4)
4.0690 μs per bit, pulse:589
-------------------
Pulse in ms > 2.5
setServoPulse(1, 2.5)
4.0690 μs per bit, pulse:614
-------------------
... etc.

Once you have determined the appropriate min and max values, you also have the int values to feed the setPWM with.

Some links:

Tuesday, April 24, 2018

Controlling invisible machines with emails, from Java

Here is the problem

You have your network at home, with several machines connected to it (laptops, tablets, Raspberry PIs, phones, etc). Your home network is a Local Area Network (aka LAN), the machines can see each other, but they cannot be seen from outside, from the Internet.
You may very well want to deal with those machines while away from home, to restart services, launch a new program, or even reboot.
In the configuration mentioned above, this is simple, you just cannot do it. And that is frustrating!
There is a way though. Those machines on your home LAN can send and receive emails...

Using JavaMail

JavaMail is a Java package that has been available for ever, it understands the email protocols (IMAP, POP3, SMTP, etc), and can be used to interact with email accounts programmatically.

An example

There is an example of such an interaction on this github repository.
The fastest way to get it running is to run the following commands (these are for Linux - and MacOS - on Windows, use the git shell):
$ git clone https://github.com/OlivierLD/raspberry-coffee.git
$ cd raspberry-coffee
$ cd common-utils
$ ../gradlew shadowJar
$ cp email.properties.sample email.properties
$ vi email.properties
$ # Here you modify your properties file to match your email account
$ java -cp ./build/libs/common-utils-1.0-all.jar email.examples.EmailWatcher -send:google -receive:google
The -send:google -receive:google depends on the settings in your email.properties.
Then, to the account mentioned in the email.properties, send a message like this:
Subject: execute
Content:
whoami
ifconfig
uname -a
Note: this example requires the content to be in plain/text.
Once the message is received by the EmailWatcher, it sends you an acknowledgement:
Then, the 3 commands are processed by the EmailWatcher, you would see in its console an output like that:
Start receiving.
Received:
whoami
ifconfig
uname -a

Operation: [execute], sent for processing...
pi
lo0: flags=8049 mtu 16384
 options=1203
 inet 127.0.0.1 netmask 0xff000000 
 inet6 ::1 prefixlen 128 
...
And finally, you receive an email like that:
... meaning that the commands you've sent have been executed.

You can also attach the script to execute to a blank email, with topic execute-script:
Attach a file like this:

#!/bin/bash
whoami
ifconfig
ps -ef | grep EmailWatcher
... and just wait for the result to come back to you:
Scripts execution returned: 
pi
eth0: flags=4099  mtu 1500
        ether a4:ba:db:c9:04:2e  txqueuelen 1000  (Ethernet)
        RX packets 0  bytes 0 (0.0 B)
        RX errors 0  dropped 0  overruns 0  frame 0
        TX packets 0  bytes 0 (0.0 B)
        TX errors 0  dropped 0 overruns 0  carrier 0  collisions 0
        device interrupt 18  

lo: flags=73  mtu 65536
        inet 127.0.0.1  netmask 255.0.0.0
        inet6 ::1  prefixlen 128  scopeid 0x10
        loop  txqueuelen 1  (Local Loopback)
        RX packets 9215  bytes 2022884 (1.9 MiB)
        RX errors 0  dropped 0  overruns 0  frame 0
        TX packets 9215  bytes 2022884 (1.9 MiB)
        TX errors 0  dropped 0 overruns 0  carrier 0  collisions 0

wlan0: flags=4163  mtu 1500
        inet 192.168.42.3  netmask 255.255.255.0  broadcast 192.168.42.255
        inet6 fe80::4038:1f53:b94f:ccc2  prefixlen 64  scopeid 0x20
        ether 78:e4:00:78:ad:8f  txqueuelen 1000  (Ethernet)
        RX packets 8848724  bytes 696021134 (663.7 MiB)
        RX errors 0  dropped 0  overruns 0  frame 18848059
        TX packets 6040965  bytes 795472510 (758.6 MiB)
        TX errors 0  dropped 0 overruns 0  carrier 0  collisions 0
        device interrupt 17  base 0xc000  

pi      12476 12472  1 16:39 pts/0    00:00:53 java -cp ./build/libs/RasPISamples-1.0-all.jar weatherstation.email.EmailWatcher -send:google -receive:google
pi      16204 16199  0 18:04 pts/0    00:00:00 grep EmailWatcher
>> sh ./attachments/2018-04-26_18-04-27/sample.sh returned status 0

Comments

This process is not synchronous, this could be a drawback... But still, it allows you to interact remotely with machines invisible from the Internet.

Having the command

java -cp ./build/libs/common-utils-1.0-all.jar email.examples.EmailWatcher -send:google -receive:google
fired when the machine boots will allow you make sure it is waiting for your emails as soon as the machine is up.

This EmailWatcher as it is also allows you to execute scripts, attached to the email. Look into the code for details ;)
It is even possible to ssh to another machine and execute a bunch of commands stored in a script... The command you send in the email's body would be like

ssh pi@192.148.42.13 bash -s < ~/nodepi.banner.sh
If a password is required, use sshpass:
sshpass -p 'secret-password' ssh pi@192.148.42.13 bash -s < ~/nodepi.sudo.sh
You can even sudo:
echo 'secret-password' | sudo -S privilegedCommand
This can be dangerous, hey? With great power come great responsibilities...

Sunday, September 10, 2017

Moving the Raspberry PI away from Swing

Rationale

This starts from a simple observation. A Raspberry PI can run on a boat, and consumes a very small amount of energy. It can do a lot of computations, logging, and multiplexing, among many others. It can run 24x7, without you noticing. It makes no noise, almost no light, and requires ridiculous amount of energy to run. Even a Raspberry PI Zero does this kind of job (for even less power), successfully.
One thing it is not good at is graphical UI. A graphical desktop is often too demanding on a small board like the Raspberry PI Zero. It becomes some times really slow, and cumbersome.
Running on it a program like OpenCPN seems absurd to me. Such a program runs fine on a bigger device, with several gigabytes of RAM available.
But, running a laptop 24x7 would be in many cases too demanding, specially on a sailboat, where everyone hates to run the engine ;)
I observed that at sea, I spend only a couple hours a day in front of the laptop, but it is often running by itself, doing some logging or calculations.
This is where it comes together, you could have a Raspberry PI Zero doing logging, multiplexing and what not, broadcasting require data on its own network (see the NMEA Multiplexer about that), then you would use a laptop whenever necessary, connecting on the Raspberry PI's network to get NMEA Data and more.
In addition, you can also use tablets and smart-phones, those devices know how to connect to a network, and have great rendering capabilities.
A problem is that writing a native application on those devices requires specific knowledge of the operating system, those skills are often redundant. iOS, Android, JavaFx, Swing all have UI rendering capabilities, but they're all totally different, and the learning curve for each of them is not always smooth.
A solution would be to write the UI part of the applications using HTML. Whatever OS runs on your laptop, tablet or smartphone (Windows, MacOS, iOS, Linux, Android, etc), you have a browser available, supporting HTML5 (if it does not, you should really upgrade it).
HTML5 and JavaScript have been gaining a lot of momentum in the recent years, new frameworks like jQuery, ionic, ReactJS, ...) appear every day, and provide really rich and nice UI.
My feeling would be to go down this route whenever possible, that would save a lot of efforts, and provide a pretty cool Graphical User Interface (GUI). I have written a lot of GUI in Swing. It would be now time to upgrade it. Re-writing them using JavaFX does not sound like the right choice. If I have to learn a new language to build a modern GUI, for now I'd rather use JavaScript and HTML5. This way, the same code runs whenever a browser exists... You have REST APIs available on the server (again, a Raspberry PI, even the Zero does the job well), and you use AJAX and Promises to get to them from the Web UI (WebSockets are also a realistic option, tested). The computation required to produce the payload returned by the REST services (often in json format) is easily supported by a Raspberry PI, and the complexity of the UI rendering is 100% taken care of by the browser, running on a more powerful device.

Implementation

To make sure all this is realistic, we have a REST implementation of a Tide Server, available here.
First, we have defined the REST Services, like
 /GET /tide-stations
 /GET /tide-stations/{station}
 /POST /tide-stations/{station}/wh?from=XXX&to=YYY
 /POST /tide-stations/{station}/wh/details?from=XXX&to=YYY
this is the easy part - and then an HTML5/JavaScript User Interface.


Harmonic coefficients are available for display


Period of time goes - in this UI - up to 1 month.


For one month, with harmonic coefficients, the volume of data transferred from the server is about 10Mb, it took about 14 seconds to get them.


In a most common case, it is around 25Kb.


This is running on a Raspberry PI, even a Raspberry PI Zero does the job without complaining.
There are a couple of challenges to address, JavaScript is not very well TimeZone equipped. But there are ways to get it to work.
That seems to be a viable approach.
Interestingly, even if we are trying here to address an energy problem - and not a budget one - a Raspberry PI Zero today cost just $10.

Saturday, December 31, 2016

NMEA Multiplexer, OpenCPN, GPSd...

I have been working on an NMEA Multiplexer that can run on small boards, like the Raspberry PI Zero. The code is available on github, see the documentation in the README.md.

It allows to mix all kinds of NMEA Sources into a single (or multiple) stream(s). You can read from Serial Ports, Log file(s), TCP, WebSocket, Sensors (like BME280, HTU21DF, LSM303, etc), merge those data and rebroadcast them on Serial port, TCP, Log file, WebSocket, GPSd, etc. UDP is being worked on.

Data can also be computed and injected in the output stream, like True Wind, Current direction and speed, etc.

As a graphical desktop can be cumbersome on small boards, the Multiplexer comes with a tiny HTTP server that provides a Web UI and REST services to allow remote Admin.

It also comes with several demos and samples
This all works just fine with OpenCPN, SeaWi, that can take TCP streams as NMEA Data Input.
I was also wondering about GPSd. I had some mixed feelings about it. Mostly, I was asking myself "Why should I parse GPSd json objects if I can parse NMEA Sentences?", and could not find any satisfying reason. The topic is mentioned on the GPSd web site's FAQ pages, but nothing clear (to me) came up from that.
Interestingly, OpenCPN can also take GPSd streams as input. But there is a trick.
The first GPSd exchange begins with a ?WATCH request. It is followed by a JSON Object like this:
  ?WATCH={"enable":true,"json":true}
... and here is the trick, OpenCPN sends a
 ?WATCH={"enable":true,"nmea":true}
This nmea option is "poorly" documented, but very useful. Instead of sending JSON objects, GPSd spits out the raw NMEA sentences, as they were read. Then GPSd is just a regular TCP stream, and OpenCPN already knows how to parse the NMEA sentences it delivers. This way, GPSd is not limited to strictly GPS-related sentences. It can convey all NMEA sentences, Boat Speed related, Wind related, etc. This is what the GPSd forwarder that comes with the Multiplexer is doing.
Happy Streaming, happy new year!

Friday, December 11, 2015

Raspberry PI Zero is here

I just received mine. And it just works. It takes a ridiculous amount of energy, and works just like its bigger brothers. Just a couple of things to keep in mind:
  • Use the latest RasPian image, I used - successfully - the one from Nov-11, 2015 (2015-11-21-raspbian-jessie.img)
  • If you use a desktop USB keyboard, you need a powered USB hub
  • Once started, do not forget to expand your file system, so it uses all the space available on your SD card
I used it with the small Edimax Wireless USB dongle (the powered hub is not required for this one), I got started in no time. I was able to ssh to it and run everything on it! So far, it is an amazing machine. A real fully featured Linux computer for $5. And 20 times more memory than the one I had in my desk 25 years back...
. . .
That would remind many things to some of us... Amstrad, Amiga, Atari, wow! I must be getting old.

PS: About the pinout: Put the SD Card on top, the biggest Raspberry design under the board. The pin #1 (3V3) is at the top left of the header.

Thursday, November 19, 2015

Monitor the Boat, remotely

With a FONA connected on the Raspberry PI (where the NMEA Console is running), you can remotely monitor what's going on.
Sending a '?' returns the menu, all subsequent available commands are 1 or 2 character long.

The feature has been implemented - as usual - as a UserExit. This UserExit is in the Desktop repo, the FONA Java interface is here.
Add the following parameter to the command line:
 -ue:olivsoftdesktopuserexits.FONAUserExit

Just by sending an SMS, you can retrieve the data read by the Raspberry PI on board, like True Wind Speed, Battery Voltage, Air and Water Temperature, etc, all you need is a smart phone that can send and receive SMSs.

That sounds promising...

This assumes that the boat is docked in a place where there is SMS coverage, of course. I'm working on an Internet version, with a Particle Photon, or an ESP8266...

Saturday, June 06, 2015

Scala on the Raspberry PI

As Scala compiles its files as Java class-files, they run on a regular JVM, with a few Scala-specific jar-files in the classpath.
Even if it is not the most productive way to get work done, it is possible to compile Java files on the Raspberry PI, as well as Scala files. Personally, I prefer to develop in an IDE, and use FTP to push the classes to the Raspberry PI, it's much faster, and the IDE is much more productive than vi.
The explanations I found here got me started.
And again, as Scala runs on a Java Virtual Machine (JVM), all the work done with PI4J is fully available from Scala.
The following code (available on github) shows how to read a BMP180 from Scala:
 import adafruiti2c.sensor.AdafruitBMP180

 object Scala_101 {
   def main(args: Array[String]) {
     println("Hello, Scala world!")
     val bmp180 = new AdafruitBMP180
     try {
       val temp  = bmp180.readTemperature
       val press = bmp180.readPressure / 100
       println(s"CPU Temperature   :  ${SystemInfo.getCpuTemperature}\272C")
       println(s"Temp:${temp}\272C, Press:${press} hPa")
     } catch {
       case ex: Exception => {
         println(ex.toString())
       }
     }
   }
 }
  
To run it, I used a script like this:
 #!/bin/bash
 # 
 SCALA_HOME=/home/pi/.sbt/boot/scala-2.10.3
 PI4J_HOME=/opt/pi4j
 #
 CP=$SCALA_HOME/lib/scala-library.jar
 # 
 CP=$CP:$PI4J_HOME/lib/pi4j-core.jar
 CP=$CP:../AdafruitI2C/classes
 CP=$CP:./out/production/Scala.101
 # 
 sudo java -classpath "$CP" Scala_101
  
And all is good, the output is
 Hello,Scala world!
 CPU Temperature  :40.6°C
 Temp:22.5°C, Press:1010.73 hPa

Thursday, May 07, 2015

Web Console improvements

With the Raspberry PI now able to behave as an Access Point, almost all devices can connect to it (Apple, Android, all kind of phones or tablets). Using an HTML5 enabled browser makes live easier than writing a dedicated application for the given Operating System.
That's why we now have some improvements in the Web Console:
See above the "Night" scheme, with or without borders for the displays
Same for the "Day" scheme.

The HTML5 console is accessed from http://machine:port/html5/console.html, default port being 9999.
If you have installed node.js and the WebSocket user-exit, then you access the WebSocket console from http://machine:9876/data/console.ws.html
It is still self-contained, no external framework is used (like JQuery et al). Those are great - for sure - but this is to be run on a boat at sea, with Internet out of reach.
Notice on the snapshots that several data come from some sensors hooked-up on the Raspberry PI. They can be shown or hidden from the preferences or from the Console Admin page.
Notice that the Console Admin page has been removed from the Console, it can now be accessed from a separate URL, on the admin port (8080 by default) at http://machine:port/html5/admin.html, started when the console is in headless mode:
The default values on the pages above come from the Desktop Preferences.
And there is now a CLI (Command Line Interface) for to access those preferences from a non-graphical environment (like on the Raspberry PI).
The class to launch is olivsoftdesktop.PreferencesCLI. An entry will added soon in the User Interfaces.

All this runs fine on the Raspberry PI, all the snapshots above have been taken with the Raspberry PI run node.js as server.

An idea...

Anyone with a smartphone or a tablet can access those live data. The problem is to type in the right URL...
Once you have chosen your configuration (IP address and ports), you can generate QR Code (https://www.the-qrcode-generator.com/ worked for me), print them, and post them somewhere in the boat. Whoever wants to reach the data just uses his QR Scanner - all smart stuffs have at least one - and boom! You're in!

HTML5 console

HTML5 WebSocket console

HTML5 Admin console
Those pages support query string parameters theme and border. theme can be 'white' or 'black', border can be 'Y' or 'N'.
Like in http://machine:9999/html5/console.html?theme=white&border=N

There are several QR Code generators, including some you can run off-line. This one works just fine, and can be installed on the computer on the boat, so you can generate your codes from anywhere. As you can see here.

Thursday, March 05, 2015

OpenCPN on the Raspberry PI model 2

I just received the new Raspberry PI model B, it comes with 1Gb of RAM.
And it seems that OpenCPN runs just fine on it!
I started from the last NOOBS available from the Raspberry PI website.
Here are the steps I had to go through to build it:
Prompt> sudo apt-get update
Prompt> sudo apt-get install -y libgtk2.0-dev gettext git-core cmake gpsd gpsd-clients \
  libgps-dev build-essential wx-common libwxgtk2.8-dev \
  libglu1-mesa-dev libgtk2.0-dev wx2.8-headers \
  libbz2-dev libtinyxml-dev libsdl1.2debian xcalib

Prompt> git clone https://github.com/seandepagnier/OpenCPN.git
Prompt> cd OpenCPN/
Prompt> mkdir build
Prompt> cd build
Prompt> cmake ../
Prompt> make
Prompt> sudo make install
After that, at the prompt you enter:
Prompt> opencpn &
And that's it!
And by the way, it works the same on all the Ubuntu-like distributions I tested.

Monday, July 28, 2014

The self-sufficient Raspberry PI

Here is a picture of the Raspberry PI setup to log the data from a GPS, and fueled by a solar panel.
This one has the small touchscreen from Adafruit (zoom on it). The tray and the breadboard are not mandatory in this setting. Next step will be to use two servos to orient the solar panel so it faces the sun. This would be based on the project available on Google Code. That's the cool thing about using Java on the Raspberry PI. Whatever works in Java works on it.